The VIEW Ribbon

Le ruban d'affichage permet de passer d'un mode d'affichage à un autre. Il permet de voir toutes les diapositives sur une page, ou de travailler en mode plan ou également de passer en mode Masque qui vous permet la mise en page de votre présentation.
The VIEW RIBBON allows you to switch between various display mode. It allows you to see all the slides on one page, or to work in OUTLINE mode or also enter the SLIDE MASTER mode that lets you shape your presentation.
Les icones of the presentation views allows 5 modes:
The normal mode is the one you use every day.
The Outline View allows to create a presentation very rapidely and gives you a nice overview of all the texts.
You can type the text in the left area and the slide too.
The Slide Shorter View allows to see all the slides at once.
You can easily move slides to other parts of your presentations.
Here I have selected the marked slides 6 (circled in red) and I can move them elsewhere.
Tips and Tricks 1
To select individual slides, hold down the CTRL key pressed and click the slides you want.
If you click on a slide and then press SHIFT, and click on
another more distant, ALL slides between the two will be selected.
Finally, the last icon, reading view shows the presentation in full screen mode as it would be seen by your audience.
Tips and Tricks 2
You can also change the mode by clicking on the 4 icons at the bottom right of the screen.

THE MASTER VIEW

Masks or Masters may seem complicated at first but with time you will understand them well.
Consider the mask as the canvas, the skeleton, the outline of your presentation. All texts and pictures that you insert in this mask will attach to the mask and appear on all slides that are using this mask.
The mask defined the style of the text, if it's red, green or blue, bold or normal.
The mask allows you to hang a picture or a logo in the corner of the presentation and to appear on each slide automatically, etc ...
In the following example, you see a master that I played with and added a lot of graphics. The full presentation will follow this style.
Like for the Slide Master, you can also change the handout master and footnote master of your presentation.
La SHOW Area
The SHOW area allows you to add a guide, a gridline and a ruler on your screen. This helps to precisely position objects on your presentation.
Guides can be positioned anywhere on the screen with the mouse.
The Notes icon opens the footnotes page at the bottom of the screen. You can enlarge the area by positioning the mouse at the intersection between the bottom of the presentation and the higher part. The cursor will change to a double arrow and you can move the area.
The following icons are used to adjust the zoom to a specific value. This is not used so much.
Tips and Tricks
The zoom can be activated by holding the CTRL key and turning the mouse wheel forward or backward.
Also by moving the cursor to the left or right.
Color/Greyscale icons
They allow you to change the layout in gray or black and white. This allows to see what your slides will look like when printed in black and white for example.
Tips and Tricks
These are 3 nice colours....
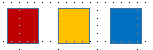
But once printed, they do not look so nice anymore...
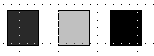
So be careful to the choice of your colours.
The following icons allow you to rearrange the windows. If you have multiple windows open, this can be very useful.
The first is the most interesting. New window opens a second window of your presentation. You can have side by side two different slides of your presentation. Useful to compare what you have written before.
Tips and Tricks
ALT + TAB buttons allow you to move from one window to another. Attention it will also display windows of other open programs.